5 Proven Ways to Fix Unable to Play Video Error in PPT
Effective solutions to resolve video playback issues in Microsoft PowerPoint
Encountering a video playback error in PowerPoint can disrupt your workflow and leave you feeling frustrated. Whether you're preparing for a critical presentation or working on an academic project, such issues demand immediate attention. Common culprits include unsupported file formats, corrupted media, or outdated software. These problems not only waste time but also jeopardize the quality of your presentation. To ensure smooth playback, you need practical solutions that address these challenges effectively. Let's explore how to fix unable to play video error in PPT and restore your presentation's functionality.
Key Takeaways
- Ensure your video is in a supported format like MP4 or WMV with H.264 codec to avoid playback errors.
- Keep your video files organized by storing them in the same folder as your PowerPoint presentation to prevent file path issues.
- Regularly update Microsoft PowerPoint to the latest version to enhance compatibility with modern video formats.
- Install necessary codecs, such as the K-Lite Codec Pack, to resolve playback issues caused by missing codecs.
- Test your presentation in Slide Show mode before the actual presentation to identify and fix any playback problems.
- Use PowerPoint's 'Check Compatibility' feature to quickly identify unsupported media files and codec issues.
- Consider using AI tools like PageOn.ai to streamline the creation of professional presentations and ensure smooth media integration.
Common Reasons for Video Playback Errors in PowerPoint
Understanding why video playback errors occur in Microsoft PowerPoint can help you address the issue effectively. Below are some of the most common reasons that might disrupt your presentation.
Common Causes of Video Playback Errors
The following diagram illustrates the primary factors that lead to video playback issues in PowerPoint:
flowchart TD
    A[Video Playback Error] --> B[Unsupported Format]
    A --> C[Missing/Corrupted File]
    A --> D[Outdated PowerPoint]
    A --> E[Missing Codecs]
    A --> F[File Path Issues]

    B --> B1[Convert to MP4/WMV]
    C --> C1[Replace or Repair File]
    D --> D1[Update PowerPoint]
    E --> E1[Install Codec Pack]
    F --> F1[Store in Same Folder]
Unsupported Video Format
PowerPoint supports specific video formats, such as MP4 and WMV, encoded with the H.264 codec. If your video file uses an unsupported format, like SWF, it won't play. This limitation stems from PowerPoint's strict compatibility requirements for media files. To resolve this, you should convert the video to a supported format using reliable video conversion tools. Always check the file extension and codec before embedding the video into your presentation.
Tip: Use the "Check Compatibility" feature in PowerPoint to identify unsupported media files. Navigate to the File menu, select Info, and then click Check Compatibility under the "Check for Issues" dropdown.
Missing or Corrupted Video File
A missing or corrupted video file can prevent playback in Microsoft PowerPoint. If the file is damaged, PowerPoint cannot decode or render it properly. Corruption may occur due to incomplete downloads, file transfer errors, or storage issues. To verify the file's integrity, try playing it outside PowerPoint using a media player. If it doesn't work, you may need to replace the file with a functional version or repair it using specialized software.
Outdated Microsoft PowerPoint Version
Using an outdated version of Microsoft PowerPoint can lead to compatibility issues with modern video formats. Older versions may lack the necessary updates to support newer codecs or file types. To fix this, update PowerPoint to the latest version. Regular updates not only improve compatibility but also enhance overall performance and security.
Steps to update PowerPoint:
- Open any Office application and go to File > Account.
- Click Update Options and select Update Now.
- Restart PowerPoint after the update completes.
Codec Issues
Missing codecs often cause video playback errors in PowerPoint. A codec is a software component that encodes or decodes digital media files. Without the required codec, your computer cannot process the video file, leading to playback issues. For instance, if your video uses a codec not installed on your system, PowerPoint will fail to play it.
To resolve this, you should install a reliable codec pack, such as the K-Lite Codec Pack. This pack includes a wide range of codecs that support various video formats. Follow these steps to address codec-related problems:
- Download a Codec Pack: Visit the official website of a trusted codec pack like K-Lite Codec Pack. Choose the version that suits your operating system.
- Install the Codec Pack: Run the installer and follow the on-screen instructions. Ensure you select all necessary codecs during installation.
- Restart Your Computer: After installation, restart your system to apply the changes.
- Test the Video Playback: Open the video in PowerPoint to confirm that the issue has been resolved.
File Path or Location Problems
The location of your video file plays a crucial role in its playback within PowerPoint. If the file path changes after embedding the video, PowerPoint may fail to locate it. This issue commonly occurs when you move the video file to a different folder or rename it after linking it to the presentation.
To avoid file path problems, follow these best practices:
- Keep Files in the Same Folder: Store your video files in the same folder as your PowerPoint presentation. This practice ensures that PowerPoint can easily locate the linked files.
- Avoid Renaming or Moving Files: Once you embed a video, do not rename or move it. Any changes to the file name or location will break the link in PowerPoint.
- Use Absolute File Paths: If you must link a video, use an absolute file path instead of a relative one. Absolute paths provide the exact location of the file on your system, reducing the risk of errors.
Tip: Before presenting, test your slideshow on the same device to confirm that all videos play correctly. This step helps you identify and fix any file path issues in advance.
Troubleshooting Video Playback: Convert the Video to a Compatible Format

When PowerPoint fails to play a video, the issue often lies in the file's format. Converting the video to a compatible format can resolve this problem and ensure smooth playback during your presentation. Follow these steps to address this issue effectively.
Identify Supported Video Formats in PowerPoint
PowerPoint supports specific video formats, such as MP4 and WMV, encoded with the H.264 codec. If your video uses an unsupported format, like AVI or SWF, it will not play. Identifying the correct format is the first step in troubleshooting video playback issues.
PowerPoint Video Format Compatibility
The chart below shows compatibility levels of different video formats with PowerPoint:
To check if your video is compatible:
- Right-click the video file and select Properties.
- Look for the file extension (e.g., .mp4, .wmv) and codec information.
- Compare this information with PowerPoint's supported formats.
Use Free or Paid Video Conversion Tools
If your video format is incompatible, you need to convert it. Reliable video conversion tools can help you transform your file into a PowerPoint-supported format. Both free and paid options are available, depending on your needs.
Here are some popular tools for video conversion:
- HandBrake: A free, open-source tool that supports multiple formats.
- Any Video Converter: Offers both free and premium versions with advanced features.
- Adobe Media Encoder: A professional-grade tool for high-quality conversions.
Steps to convert your video:
- Open the video conversion tool of your choice.
- Import the video file by clicking Add File or dragging it into the interface.
- Select a PowerPoint-compatible format, such as MP4 with H.264 encoding.
- Adjust settings like resolution and bitrate for optimal playback quality.
- Click Convert and save the new file to your computer.
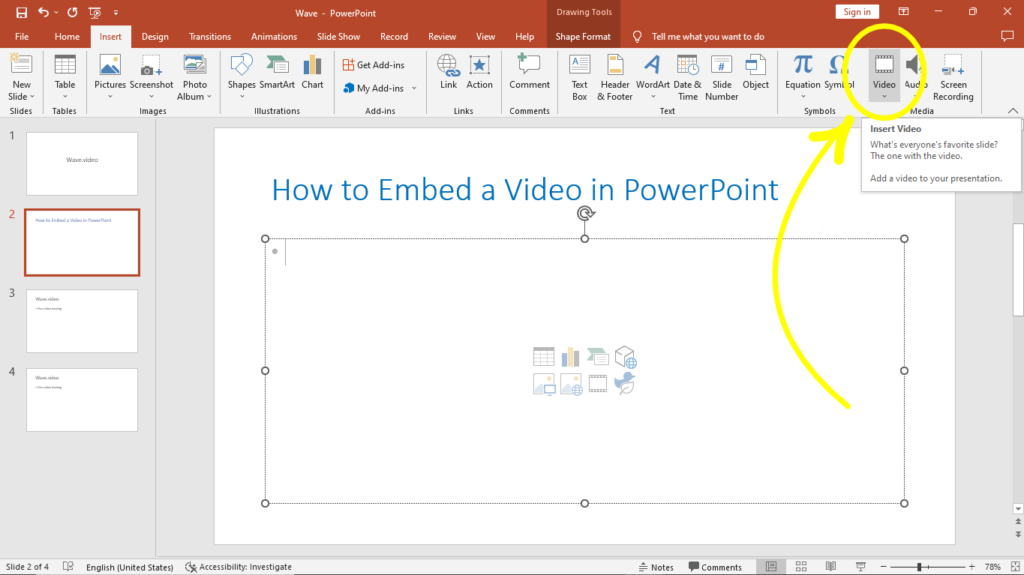
Reinsert the Converted Video into the Presentation
After converting the video, you must reinsert it into your PowerPoint presentation. This step ensures that the updated file replaces the incompatible one.
Follow these steps to reinsert the video:
- Open your PowerPoint presentation.
- Navigate to the slide where the video will appear.
- Click Insert > Video > Video on My PC.
- Select the converted video file and click Insert.
- Test the video by playing it in Slide Show mode.
Tip: Save your presentation after reinserting the video to avoid losing changes. Always test the entire slideshow to confirm that all videos play without issues.
Troubleshooting Video Playback: Ensure the Video File is in the Correct Location
File Organization Best Practices
The following diagram illustrates the recommended file organization structure:
flowchart TD
    A[Presentation Folder] --> B[presentation.pptx]
    A --> C[video1.mp4]
    A --> D[video2.mp4]
    A --> E[images]
    E --> F[image1.jpg]
    E --> G[image2.png]

    style A fill:#FF8000,stroke:#333,stroke-width:2px
    style B fill:#FFC107,stroke:#333,stroke-width:1px
    style C fill:#4CAF50,stroke:#333,stroke-width:1px
    style D fill:#4CAF50,stroke:#333,stroke-width:1px
Keep the Video File in the Same Folder as the Presentation
PowerPoint relies on the file path to locate embedded or linked videos. If you store your video files in different locations, PowerPoint may fail to find them during playback. To avoid this issue, always keep your video files in the same folder as your PowerPoint presentation. This practice ensures that PowerPoint can easily access the media files without encountering errors.
Tip: Before embedding a video, create a dedicated folder for your presentation and all related media files. This approach simplifies file management and reduces the risk of playback issues.
Avoid Moving or Renaming the Video File After Embedding
Once you embed or link a video in PowerPoint, any changes to the file name or location can break the connection. PowerPoint will no longer recognize the file, resulting in playback errors. To prevent this, avoid renaming or moving the video file after embedding it into your presentation.
If you must rename or relocate the file, reinsert it into PowerPoint to update the link. This step ensures that the presentation references the correct file.
Use Absolute File Paths for Linked Videos
When linking videos in PowerPoint, using absolute file paths can improve reliability. An absolute file path specifies the exact location of the file on your system, making it easier for PowerPoint to locate the video. This method is particularly useful if you plan to transfer your presentation to another device.
To use absolute file paths:
- Save your video file in a permanent location on your computer.
- Link the video to your presentation by selecting Insert > Video > Video on My PC.
- Ensure that the file path remains unchanged when transferring the presentation.
Note: If you need to share your presentation, include the video files in the same folder. Compress the folder into a ZIP file to maintain the file structure during transfer.
Fix Unable to Play Video Error in PPT: Update PowerPoint to the Latest Version
Updating Microsoft PowerPoint to its latest version is a crucial step to fix unable to play video error in PPT. Outdated software often struggles with modern video formats and codecs, leading to playback issues. By ensuring your PowerPoint is up-to-date, you can resolve compatibility problems and enhance the overall performance of your presentations.
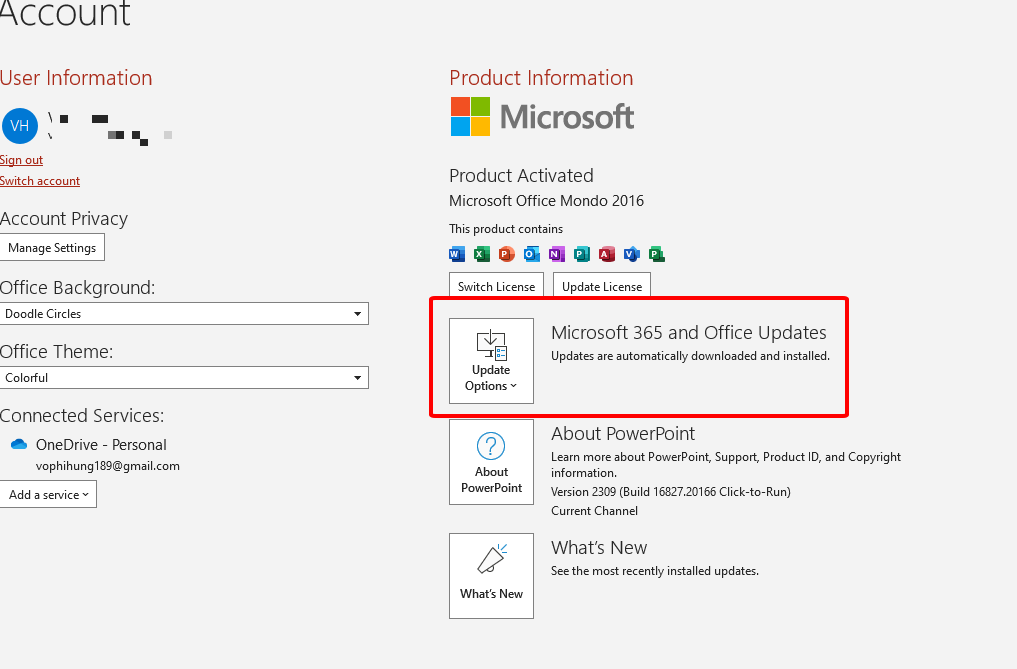
Check for Updates in Microsoft Office
To begin, you need to verify if updates are available for your Microsoft Office suite. Microsoft frequently releases updates to address bugs, improve functionality, and enhance compatibility with various media formats. Checking for updates is straightforward:
- Open any Microsoft Office application, such as Word or PowerPoint.
- Navigate to the File menu and select Account.
- Under the Product Information section, click Update Options.
- Choose Update Now to check for the latest updates.
Install the Latest Version to Fix Compatibility Issues
If updates are available, proceed to install them immediately. Installing the latest version of PowerPoint ensures that your software supports modern video formats and codecs. This step is essential for resolving playback errors caused by outdated features.
- Follow the on-screen instructions provided by Microsoft Office to complete the update process.
- Allow the installation to finish without closing the application or turning off your device.
Restart PowerPoint After Updating
Once the update is complete, restart PowerPoint to apply the changes effectively. Restarting ensures that all new features and fixes are fully integrated into the application. This step is vital for resolving any lingering playback issues.
- Close PowerPoint completely after the update.
- Reopen the application and load your presentation.
- Test the video playback in Slide Show mode to verify that the issue is fixed.
Note: If the problem persists, consider re-embedding the video file or converting it to a PowerPoint-compatible format. These additional steps can further enhance the reliability of your presentation.
Fix Unable to Play Video Error in PPT: Install Missing Codecs
Understand What Codecs Are and Why They Matter
Codecs play a vital role in video playback. They are software components that encode and decode digital media files, ensuring compatibility between the file and the application. Without the correct codec, your video cannot play in Microsoft PowerPoint. For example, if your video uses a codec that PowerPoint does not support, the software will fail to process the file.
To identify codec-related issues, you can use PowerPoint's "Optimize Compatibility" feature. Open your presentation, go to the File tab, and select Info. If PowerPoint detects any media compatibility problems, it will prompt you to optimize the file. This step helps you determine whether missing codecs are causing the playback error.
How Codecs Work in Video Playback
This diagram illustrates how codecs function in the video playback process:
flowchart LR
    A[Video File] --> B[Decoder]
    B --> C{Codec Available?}
    C -->|Yes| D[Process Video]
    C -->|No| E[Playback Error]
    D --> F[Display Video]
    E --> G[Install Codec]
    G --> B
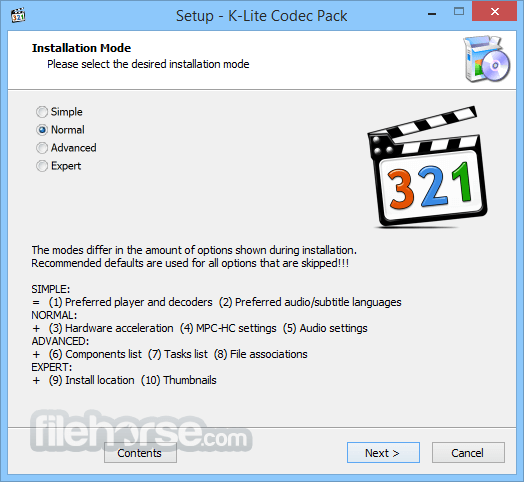
Download and Install a Codec Pack (e.g., K-Lite Codec Pack)
If missing codecs are the root cause of your video playback error, installing a codec pack can resolve the issue. A codec pack contains a collection of codecs that support various video and audio formats. One of the most reliable options is the K-Lite Codec Pack, which is widely used for its compatibility and ease of installation.
Follow these steps to download and install a codec pack:
- Visit the Official Website: Go to the official website of the K-Lite Codec Pack or another trusted source. Avoid downloading from unverified sites to prevent malware risks.
- Choose the Appropriate Version: Select the version that matches your operating system. For most users, the standard version suffices.
- Download the Installer: Click the download link and save the installer file to your computer.
- Run the Installer: Open the downloaded file and follow the on-screen instructions. During installation, ensure you select all necessary codecs for video playback.
- Restart Your Computer: After completing the installation, restart your system to apply the changes.
Test the Video Playback After Installing Codecs
After installing the codec pack, you need to test the video playback in PowerPoint to confirm that the issue has been resolved. Open your presentation and navigate to the slide containing the video. Play the video in Slide Show mode to check its functionality.
If the video still does not play, consider re-embedding it into your presentation. Use the following steps:
- Open your PowerPoint file and go to the slide where the video is embedded.
- Remove the existing video by selecting it and pressing Delete.
- Click Insert > Video > Video on My PC to add the video again.
- Select the file and click Insert to embed it into the slide.
Optimize PowerPoint Playback Settings for Better Video Playback

Optimizing your PowerPoint playback settings can significantly enhance video performance during presentations. By fine-tuning these settings, you ensure a seamless viewing experience for your audience. Below are actionable steps to improve video playback in PowerPoint.
Adjust Playback Options (e.g., Start Automatically or On Click)
PowerPoint provides flexible playback options that allow you to control how videos behave during your presentation. You can set videos to start automatically when the slide appears or play them only when clicked. Choosing the right option depends on your presentation style and audience engagement goals.
To adjust playback options:
- Select the video in your PowerPoint slide.
- Navigate to the Playback tab in the ribbon.
- Under the Video Options group, choose between:
- Start Automatically: The video begins playing as soon as the slide loads.
- Start On Click: The video plays only when you click on it during the presentation.
Video Playback Options Comparison
This chart compares different playback settings and their suitability for various presentation scenarios:
Compress Media Files to Improve Performance
Large video files can slow down PowerPoint, causing delays or playback issues. Compressing media files reduces their size without compromising quality, ensuring smoother performance. PowerPoint includes a built-in feature to compress videos directly within the application.
Steps to compress media files:
- Open your PowerPoint presentation.
- Go to the File tab and select Info.
- Click Compress Media under the "Media Size and Performance" section.
- Choose a compression quality:
- Presentation Quality: Best for maintaining high resolution.
- Internet Quality: Suitable for online sharing.
- Low Quality: Ideal for email or devices with limited storage.
Test the Presentation in Slide Show Mode
Testing your presentation in Slide Show mode is essential to identify and resolve playback issues before presenting. This step allows you to experience the video as your audience would, ensuring everything functions as expected.
To test your presentation:
- Open your PowerPoint file.
- Click the Slide Show tab in the ribbon.
- Select From Beginning or From Current Slide to start the presentation.
- Play the embedded video and observe its performance.
Note: Pay attention to video quality, synchronization, and playback speed. If any issues arise, revisit the PowerPoint playback settings or consider re-embedding the video.
Recommended Tool: Create and Present Perfect PPTs with PageOn.ai

What is PageOn.ai?
PageOn.ai is an innovative AI-powered tool designed to simplify the process of creating professional PowerPoint presentations. It leverages advanced algorithms to generate visually appealing and content-rich slides based on your input. Whether you're preparing for a business meeting, academic presentation, or creative project, PageOn.ai ensures that your slides are both engaging and effective. By automating the design and content creation process, this tool saves you time and effort while maintaining high-quality results.
Why choose PageOn.ai? It eliminates the hassle of manual slide creation, allowing you to focus on delivering your message with confidence.
Key Features and Benefits of PageOn.ai
PageOn.ai offers a range of features that make it a go-to solution for creating PowerPoint presentations. Here are some of its standout benefits:
- AI-Generated Outlines: The tool provides a structured outline based on your topic, ensuring your presentation has a logical flow.
- Customizable Templates: Choose from a variety of professionally designed templates to match your presentation's theme and purpose.
- Content Suggestions: PageOn.ai suggests relevant content, including text, images, and charts, tailored to your input.
- Time Efficiency: Automates the slide creation process, reducing the time spent on formatting and design.
- Cloud Integration: Save your presentations securely in the cloud or download them in multiple formats, including PDF.
- User-Friendly Interface: Intuitive design makes it accessible even for beginners, with no prior design experience required.
Step-by-Step Guide to Using PageOn.ai for PPT Creation
PageOn.ai Workflow
This diagram illustrates the step-by-step process of creating presentations with PageOn.ai:
flowchart TD
    A[Visit PageOn.ai Website] --> B[Input Topic & Ideas]
    B --> C[Upload Reference Files]
    C --> D[Review AI-Generated Outline]
    D --> E[Choose Template]
    E --> F[Let AI Generate PPT]
    F --> G[Customize Content]
    G --> H[Save to Cloud/Download]

    style A fill:#FF8000,stroke:#333,stroke-width:1px
    style F fill:#4CAF50,stroke:#333,stroke-width:1px
    style H fill:#42A5F5,stroke:#333,stroke-width:1px
Step 1: Visit the PageOn.ai Website
Start by navigating to the official PageOn.ai website. The homepage provides an overview of the tool's features and benefits. You can sign up for a free trial or log in if you already have an account.
Step 2: Input Your Topic and Ideas, Upload Reference Files
Once logged in, enter your presentation topic and any key ideas you want to include. You can also upload reference files, such as documents or images, to guide the AI in generating relevant content.
Step 3: Review the AI-Generated Outline and Choose a Template
After processing your input, PageOn.ai generates an outline for your presentation. Review the suggested structure and make adjustments as needed. Then, select a template that aligns with your presentation's theme.
Step 4: Let AI Generate the PPT Automatically
Click the "Generate" button to let the AI create your PowerPoint slides. The tool organizes your content into visually appealing layouts, complete with images, charts, and animations. This step takes only a few minutes, making it incredibly efficient.
Step 5: Customize Themes, Charts, and Content as Needed
After the AI generates your slides, you can customize them to better fit your needs. Adjust themes, edit text, replace images, or modify charts to align with your vision. The user-friendly interface makes these changes quick and easy.
Step 6: Save Your PPT to the Cloud or Download as PDF
Once you're satisfied with your presentation, save it to the cloud for easy access or download it in your preferred format. PageOn.ai supports multiple file types, including PowerPoint (.pptx) and PDF, making it versatile for various use cases.
Common Issues with Video Playback in PowerPoint
Video Plays with No Sound
When your video plays without sound in PowerPoint, the issue often stems from audio settings or file compatibility. PowerPoint may fail to recognize the audio codec used in your video file. This mismatch prevents the software from processing the sound correctly. To resolve this, ensure your video file uses a supported format like MP4 with AAC audio encoding.
Follow these steps to troubleshoot:
- Check Your Device Volume: Ensure your computer's volume is not muted or set too low. Test the audio by playing the video in a media player outside PowerPoint.
- Verify PowerPoint Playback Settings: Select the video in your slide, go to the Playback tab, and confirm that the "Mute" option is not enabled.
- Convert the Video File: Use tools like HandBrake or Any Video Converter to re-encode the video with compatible audio settings. After conversion, reinsert the video into your presentation.
Video Freezes or Lags During Playback
Freezing or lagging videos can disrupt your presentation and frustrate your audience. These issues often occur due to large file sizes, insufficient system resources, or outdated PowerPoint versions. Optimizing your video and system settings can help you avoid such interruptions.
Here's how to address this:
- Compress Media Files: Use PowerPoint's built-in compression feature to reduce the file size. Navigate to File > Info, then click Compress Media under "Media Size and Performance."
- Update PowerPoint: Ensure you are using the latest version of PowerPoint. Updates often include performance improvements and bug fixes for video playback.
- Close Background Applications: Free up system resources by closing unnecessary programs running in the background. This action allocates more memory to PowerPoint, improving video performance.
Embedded Video Does Not Appear in Slide Show Mode
If your embedded video fails to appear during Slide Show mode, the issue may relate to file path errors or unsupported formats. PowerPoint relies on the file's location and compatibility to display videos correctly. Any disruption in these factors can cause playback problems.
To fix this:
- Verify File Location: Ensure the video file remains in the same folder as your PowerPoint presentation. Avoid moving or renaming the file after embedding it.
- Check Video Format: Confirm that your video uses a PowerPoint-supported format, such as MP4 or WMV. If not, convert the file using a reliable tool like Adobe Media Encoder.
- Reinsert the Video: Remove the existing video from your slide and reinsert it. Go to Insert > Video > Video on My PC, select the file, and click Insert.
Video Quality is Poor After Embedding
Poor video quality after embedding can diminish the impact of your presentation. Blurry visuals, pixelation, or reduced resolution often result from improper file handling or compression settings. To ensure your videos maintain their clarity and professionalism, you need to address these issues effectively.
Check the Original Video Quality
Start by verifying the quality of the original video file. If the source video is low-resolution or heavily compressed, embedding it in PowerPoint will not improve its quality. Play the video on a media player outside PowerPoint to assess its resolution and clarity.
Avoid Over-Compression During Embedding
PowerPoint offers a built-in media compression feature to reduce file sizes. While this tool is helpful, over-compression can degrade video quality. To prevent this, choose the appropriate compression level based on your presentation needs:
- Presentation Quality: Retains high resolution, ideal for professional settings.
- Internet Quality: Balances quality and file size, suitable for online sharing.
- Low Quality: Reduces file size significantly but may compromise clarity.
Use Compatible Video Formats and Codecs
Incompatible formats or codecs can lead to quality loss during playback. PowerPoint works best with MP4 files encoded with the H.264 codec. If your video uses a different format, convert it using reliable tools like HandBrake or Adobe Media Encoder. These tools allow you to optimize resolution, bitrate, and encoding settings for PowerPoint compatibility.
FAQ
Why does my video lose quality after embedding it in PowerPoint?
PowerPoint often compresses videos to reduce file size, which can lead to a loss in quality. To maintain high resolution, optimize your video before inserting it. Use tools like Camtasia or Snagit to export videos in high quality. Additionally, avoid over-compressing media files within PowerPoint. Select the "Presentation Quality" option when using the Compress Media feature to retain clarity.
Should I embed or link videos in my PowerPoint presentation?
Embedding videos saves them directly within your presentation, ensuring they play correctly even if the original file is moved. However, this increases the size of your PowerPoint file significantly. Linking videos keeps the file size smaller but requires the video to remain in its original location. If you plan to share your presentation, embedding is the safer option.
Pro Tip: For large video files, consider linking them but ensure the video and presentation are stored in the same folder to avoid playback errors.
Can I use 4K or high-frame-rate videos in PowerPoint?
Using 4K resolution or videos with more than 25 frames per second can strain most office computer graphics cards. This may result in lagging playback, freezing, or even crashing your presentation. For smoother performance, stick to HD videos with standard frame rates (e.g., 1080p at 30fps).
How can I fix a corrupted video file in PowerPoint?
A corrupted video file may not play in PowerPoint. To resolve this, optimize the media compatibility by following these steps:
- Open your PowerPoint presentation.
- Go to the File tab and select Info.
- Click Optimize Compatibility under the "Media Size and Performance" section.
This process adjusts the video file to match PowerPoint's requirements, improving playback reliability.
What should I do if my video doesn't play in Slide Show mode?
If your video fails to appear during Slide Show mode, check the file path and format. Ensure the video file is in the same folder as your presentation and uses a PowerPoint-compatible format like MP4 with H.264 encoding. If the issue persists, reinsert the video into your slide.
How can I reduce the size of my PowerPoint file with embedded videos?
Large embedded videos can inflate your PowerPoint file size. To reduce it, use the Compress Media feature:
- Open your presentation and go to the File tab.
- Select Info and click Compress Media.
- Choose a compression level, such as "Internet Quality" or "Low Quality," depending on your needs.
What is the best way to ensure smooth video playback in PowerPoint?
To guarantee smooth playback, follow these best practices:
- Use PowerPoint-supported formats like MP4 with H.264 encoding.
- Compress large video files to reduce strain on system resources.
- Avoid embedding high-resolution videos like 4K unless necessary.
- Test your presentation on the device you'll use for presenting.
Conclusion
Fixing video playback errors in your PowerPoint presentation ensures a seamless and professional experience. By using compatible formats, keeping media files organized, and updating PowerPoint regularly, you can avoid common disruptions. These steps not only resolve playback issues but also enhance the overall quality of your presentation. Additionally, tools like PageOn.ai simplify the creation process, helping you design impactful slides effortlessly. Always test your presentation beforehand to identify and address potential problems. A well-prepared presentation reflects your expertise and leaves a lasting impression on your audience.
You Might Also Like
PowerPoint Compatibility Solutions: Cross-Version Presentation Success Guide
Discover effective solutions for PowerPoint compatibility issues across versions. Learn to preserve animations, formatting, and graphics while ensuring seamless cross-platform presentation success.
Creating Impactful Cultural Presentations: AI-Driven Visual Storytelling for Cultural Expression
Discover how to create authentic cultural presentations using AI-driven visual storytelling techniques. Learn to transform cultural concepts into engaging visual narratives with PageOn.ai.
Transforming Content Discovery: Filtered Views and Metadata for Better Organization
Discover how filtered views and metadata can revolutionize content discovery and organization. Learn implementation strategies and visualization techniques with PageOn.ai.
Transforming SharePoint Navigation into Visual Clarity: A Design Framework for Enterprise-Scale Sites
Discover how to design effective navigation systems for large-scale SharePoint sites with our comprehensive visual framework. Learn global, hub, and local navigation strategies.