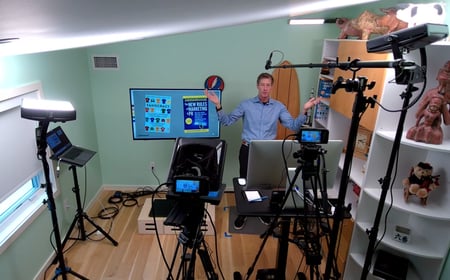
How to Create an Audio-Visual Presentation in PowerPoint
Transform your ideas into compelling stories by combining audio, video, and visuals that enhance information retention and audience engagement.
Creating an audio-visual presentation in PowerPoint allows you to deliver messages that captivate and engage your audience. By combining audio, video, and visuals, you can enhance information retention. Studies show that viewers retain 95% of a message when presented in video form, compared to only 10% through text. PowerPoint provides tools like animations, transitions, and multimedia integration to help you craft professional and impactful presentations. Adding features such as voiceovers or seamless transitions ensures your content flows smoothly and leaves a lasting impression. Learning how to make an audio visual presentation using PowerPoint can transform your ideas into compelling stories.
Key Takeaways
- Combine audio, video, and visuals to create engaging presentations that enhance information retention.
- Use high-quality multimedia elements to maintain professionalism and keep your audience focused.
- Incorporate storytelling techniques to make your presentation relatable and memorable.
- Utilize PowerPoint's tools for smooth transitions and animations to guide your audience's attention effectively.
- Tailor your content to your audience's needs and preferences for a more impactful message.
- Test your presentation thoroughly to ensure all multimedia elements function correctly before sharing.
- Explore additional tools like PageOn.ai and Canva to streamline the creation of professional presentations.
What Is an Audio-Visual Presentation?
An audio-visual presentation combines sound and visuals to communicate ideas effectively. It uses elements like images, videos, and audio to create a dynamic experience for the audience. This format enhances understanding by presenting information in a way that engages multiple senses simultaneously. Whether you are delivering a business pitch or teaching a lesson, audio-visual presentations help simplify complex topics and make them more accessible.
Definition and Purpose
Audio-visual presentations aim to convey messages through a blend of auditory and visual components. These presentations go beyond static slides by incorporating multimedia elements that capture attention and improve retention. For example, adding a video clip or a voiceover can make your content more relatable and memorable. The purpose is to deliver information in a structured and engaging manner, ensuring your audience stays focused and connected.
"Visual aids, particularly video, make new concepts easier to understand and break down complex subject matter into more easily digestible abstracts."
This approach works well in various settings, from classrooms to corporate boardrooms. By combining visuals with sound, you can create a narrative that resonates with your audience and leaves a lasting impression.
.gif)
Benefits of Using Audio-Visual Presentations
Audio-visual presentations offer several advantages that make them a preferred choice for communication:
- Enhanced Engagement: Visuals and audio together maintain audience attention better than text alone. Videos, charts, and infographics make your presentation more captivating.
- Improved Retention: Studies show that people remember 95% of a message when presented in video form, compared to only 10% through text. This makes audio-visual presentations highly effective for learning and persuasion.
- Simplified Communication: Complex ideas become easier to understand when paired with relevant visuals and clear audio narration. For instance, graphs and animations can explain data trends more effectively than words.
- Emotional Connection: Videos and soundtracks evoke emotions, making it easier to connect with your audience. This is especially useful for storytelling or persuasive presentations.
- Versatility: Audio-visual presentations work in various scenarios, such as product demonstrations, training sessions, or marketing pitches. They adapt to different purposes while maintaining their impact.
Information Retention by Presentation Method
Comparison of retention rates across different content formats:
By leveraging these benefits, you can create presentations that not only inform but also inspire action. Learning how to make an audio visual presentation using PowerPoint equips you with the tools to design impactful and professional content.
What Makes a Good Audio-Visual Presentation?
Clear and Concise Content
Your presentation should deliver information in a straightforward and organized manner. Avoid overloading slides with excessive text or irrelevant details. Focus on the key points you want your audience to remember. Use bullet points, short sentences, and headings to structure your content effectively. This approach ensures that your message remains clear and easy to follow.
"Clear and effective communication is vital for any business. AV design enhances communication by leveraging visual aids, multimedia presentations, and interactive displays."
When crafting your slides, think about the flow of information. Each slide should build on the previous one, guiding your audience through the narrative. A well-structured presentation keeps your audience engaged and helps them retain the information you share.
High-Quality Audio and Video
The quality of your audio and video significantly impacts the effectiveness of your presentation. Poor sound or blurry visuals can distract your audience and reduce the impact of your message. Use high-resolution images and videos that align with your topic. Ensure that your audio is clear, with no background noise or distortion.
Dr. James McQuivey, a renowned researcher, emphasizes the power of video by stating:
"A minute of video is worth 1.8 million words in terms of information retention."
This highlights the importance of using high-quality multimedia elements. Test your audio and video files before presenting to ensure they work seamlessly. Investing time in creating or sourcing quality media enhances the professionalism of your presentation.
Engaging Visuals and Animations
Visuals play a crucial role in capturing attention and conveying complex ideas. Use charts, graphs, and infographics to simplify data and make it visually appealing. Choose colors and fonts that are easy to read and consistent throughout your slides. Avoid cluttering your slides with too many elements, as this can overwhelm your audience.
Smooth Transitions Between Slides
Smooth transitions between slides create a seamless flow in your presentation. They help maintain your audience's focus and ensure your message is delivered without interruptions. PowerPoint offers various transition effects, but you should use them thoughtfully to enhance your content rather than distract from it.
To achieve smooth transitions:
- Choose Subtle Effects: Avoid flashy or overly complex transitions. Opt for simple effects like "Fade" or "Wipe" to keep the focus on your content.
- Maintain Consistency: Use the same transition style throughout your presentation. This consistency creates a professional and cohesive look.
- Adjust Timing: Set appropriate transition durations. Too fast can feel rushed, while too slow may lose your audience's attention. A duration of 1–2 seconds works well in most cases.
- Preview Before Finalizing: Always preview your transitions to ensure they align with the tone and pace of your presentation.
Elements of an Effective Audio-Visual Presentation
The relationship between key components that create impactful presentations:
flowchart TD
    A[Audio-Visual Presentation] --> B[Clear Content]
    A --> C[Quality Media]
    A --> D[Engaging Visuals]
    A --> E[Smooth Transitions]
    A --> F[Audience Focus]

    B --> G[Concise Text]
    B --> H[Logical Flow]

    C --> I[HD Video]
    C --> J[Clear Audio]

    D --> K[Charts & Graphics]
    D --> L[Appropriate Animations]

    E --> M[Consistent Style]
    E --> N[Proper Timing]

    F --> O[Relevant Content]
    F --> P[Accessible Design]
Audience-Centric Design
An audience-centric design ensures your presentation resonates with your viewers. Tailoring your content to their needs, preferences, and expectations makes your message more impactful. Start by understanding your audience's background, interests, and level of familiarity with the topic.
Here are some tips for creating an audience-focused design:
- Simplify Complex Ideas: Break down intricate concepts using visuals like charts, graphs, or infographics. This approach makes information more digestible and relatable.
- Use Appropriate Language: Match your tone and vocabulary to your audience. For example, use simple terms for a general audience and industry-specific jargon for professionals.
- Incorporate Visual Appeal: Choose colors, fonts, and layouts that align with your audience's preferences. A clean and organized design enhances readability and engagement.
- Engage with Questions or Prompts: Include rhetorical questions or prompts to encourage your audience to think critically about your content.
Effective Use of Storytelling
Storytelling transforms your presentation into a memorable experience. A well-crafted story captivates your audience, evokes emotions, and helps them relate to your message. Instead of presenting facts alone, weave them into a narrative that aligns with your goals.
To use storytelling effectively:
- Start with a Hook: Begin your presentation with an intriguing question, statistic, or anecdote. This grabs attention and sets the stage for your story.
- Structure Your Narrative: Follow a clear structure with a beginning, middle, and end. Introduce the problem, present the solution, and conclude with a call to action or key takeaway.
- Incorporate Multimedia: Use videos, images, or audio clips to bring your story to life.
- Make It Relatable: Share examples or scenarios your audience can identify with. This builds a connection and reinforces your message.
Storytelling adds depth and emotion to your presentation. By combining it with visuals and sound, you create a compelling narrative that leaves a lasting impression on your audience.
How to Make an Audio Visual Presentation Using PowerPoint

Creating an audio-visual presentation in PowerPoint involves combining visuals, audio, and video to deliver a compelling message. This section will guide you through the essential steps to prepare, enhance, and finalize your presentation effectively.
Preparing Your Presentation
Organizing Your Content and Visuals
Start by organizing your ideas and materials. Outline the key points you want to convey and arrange them in a logical sequence. Use bullet points or a storyboard to structure your content. This approach ensures clarity and helps you maintain focus throughout your presentation.
Visuals play a crucial role in engaging your audience. Gather high-quality images, charts, or infographics that align with your topic. Ensure these visuals support your message rather than distract from it. For example, if you're explaining data trends, a well-designed graph can simplify complex information.
"Stories have a beginning, a middle, and an end. They make us think. They make us feel. If told well, they inspire us." - Jimm Fox, President of OMM
Think of your presentation as a story. Arrange your slides to create a narrative flow, starting with an introduction, followed by the main content, and ending with a strong conclusion.
Choosing a Suitable Template
PowerPoint offers a variety of templates to suit different purposes. Select a template that complements your content and maintains a professional appearance. Look for clean designs with consistent fonts and colors. Avoid overly decorative templates, as they can overshadow your message.
PowerPoint Presentation Creation Process
Step-by-step workflow for creating an audio-visual presentation:
flowchart TD
    A[Start] --> B[Plan Content Structure]
    B --> C[Choose Template]
    C --> D[Create Slides]
    D --> E[Add Text & Visuals]
    E --> F[Insert Audio]
    F --> G[Add Video Elements]
    G --> H[Apply Animations & Transitions]
    H --> I[Review & Edit]
    I --> J[Test All Elements]
    J --> K[Export or Present]
    K --> L[Finish]

    style A fill:#FF8000,color:white
    style L fill:#FF8000,color:white
Adding Audio to Your Slides
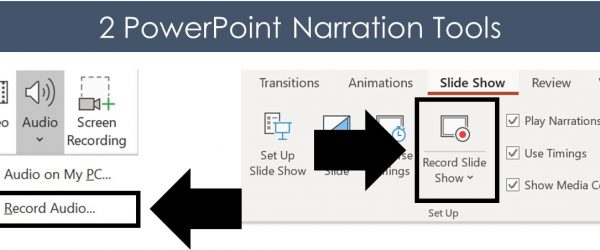
Recording Narration Directly in PowerPoint
PowerPoint allows you to record narration directly within the software. This feature is ideal for adding voiceovers to explain your slides. To record, navigate to the "Slide Show" tab and select "Record Slide Show." Speak clearly and at a steady pace while recording.
Before starting, write a script to ensure your narration is concise and relevant. Practice reading it aloud to avoid mistakes. PowerPoint records audio on a per-slide basis, so you can re-record individual slides if needed.
"Experts recommend beginning your presentation with a compelling fact, provocative question, or personal anecdote." - Harvard Business Review
Use this advice to craft an engaging introduction for your narration. A strong opening sets the tone and captures your audience's attention.
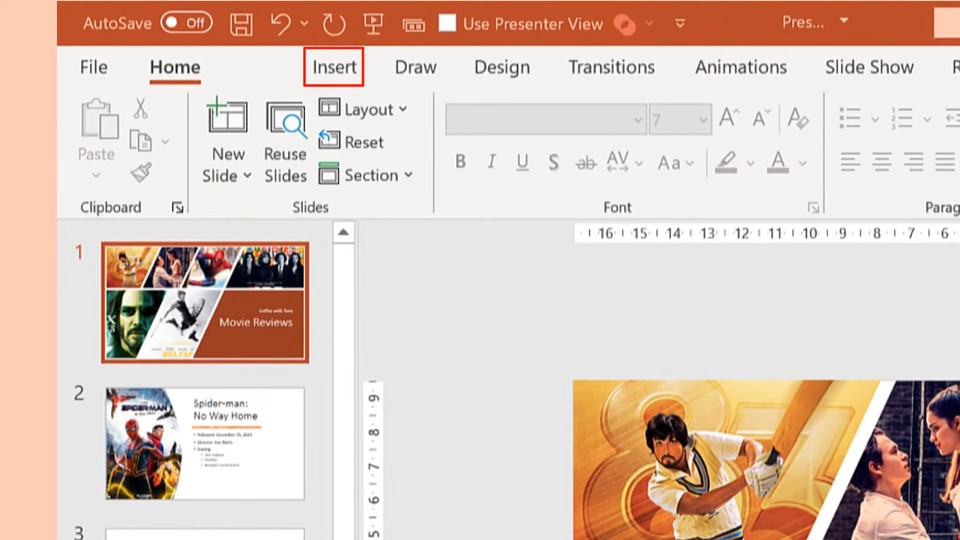
Inserting Pre-Recorded Audio Files
If you already have audio files, you can easily insert them into your slides. Go to the "Insert" tab, click on "Audio," and select "Audio on My PC." Choose the file you want to add, and position the audio icon on your slide.
Adding Video to Your Slides
Embedding Video Files
Videos add a dynamic element to your presentation. To embed a video, go to the "Insert" tab, click on "Video," and select "Video on My PC." Choose a file that supports your message and fits seamlessly into your narrative.
Resize and position the video on your slide for optimal visibility. Use the playback options to control how the video starts and stops. For instance, you can set it to play automatically or loop continuously. Preview the slide to ensure the video runs smoothly.
Linking to Online Videos
If your video is hosted online, you can link to it directly from PowerPoint. Go to the "Insert" tab, click on "Video," and select "Online Video." Paste the URL of the video, and PowerPoint will embed it into your slide.
Enhancing with Animations and Transitions
Animations and transitions can elevate your presentation by adding movement and flow. They guide your audience's attention and make your content more engaging. PowerPoint offers a variety of tools to help you apply these effects effectively.
Applying Animations to Text and Objects
Animations bring life to your slides by adding motion to text, images, or other objects. They help emphasize key points and maintain your audience's focus. To apply animations:
- Select the Object: Click on the text or object you want to animate.
- Choose an Animation Effect: Navigate to the "Animations" tab and select an effect, such as "Fade," "Zoom," or "Fly In."
- Customize the Timing: Use the "Animation Pane" to adjust the duration and order of animations. For example, you can set text to appear one bullet point at a time.
- Preview the Animation: Always preview your animations to ensure they align with your message.
Using Slide Transitions for a Seamless Flow
Slide transitions create smooth shifts between slides, ensuring your presentation flows naturally. They help maintain your audience's attention and make your narrative more cohesive. To use transitions effectively:
- Select a Transition Style: Go to the "Transitions" tab and choose a subtle effect like "Fade" or "Push." Avoid overly dramatic transitions that may distract from your message.
- Apply Consistently: Use the same transition style throughout your presentation for a polished and professional look.
- Adjust Timing: Set the transition duration to 1–2 seconds. This timing keeps the pace steady without feeling rushed or sluggish.
- Preview Your Slides: Test the transitions to ensure they enhance the flow of your presentation.
Reviewing and Editing Your Presentation
Reviewing and editing your presentation ensures it is polished and error-free. This step helps you deliver a professional and impactful message.
Checking Audio and Video Playback
Audio and video elements play a crucial role in an audio-visual presentation. Poor playback can disrupt your flow and distract your audience. To check playback:
- Test Each Slide: Play the audio and video files on every slide to ensure they work correctly.
- Adjust Volume Levels: Make sure the audio is clear and at an appropriate volume. Avoid sudden changes in sound levels.
- Verify Synchronization: Ensure that audio and video align with your content. For example, a voiceover should match the visuals it describes.
- Use a Reliable Device: Test your presentation on the device you will use during delivery. This step helps you avoid technical issues.
Ensuring Consistency in Design and Layout
Consistency in design creates a cohesive and visually appealing presentation. It helps your audience focus on your message without being distracted by mismatched elements. To ensure consistency:
- Check Fonts and Colors: Use the same font style and size across all slides. Stick to a consistent color scheme that aligns with your theme.
- Align Elements: Make sure text, images, and other objects are properly aligned. PowerPoint's alignment tools can help you achieve a clean layout.
- Review Slide Layouts: Ensure each slide follows a similar structure. For example, use the same placement for titles and bullet points.
- Proofread Your Content: Check for spelling and grammar errors. Clear and error-free text enhances your credibility.
How to Convert a PowerPoint Presentation to Video
Turning your PowerPoint presentation into a video allows you to share your content more widely and ensures a seamless viewing experience for your audience. Whether you are using Windows or MacOS, PowerPoint provides straightforward tools to help you export your presentation as a video file. Follow these step-by-step guides to create a professional video presentation.
Step-by-Step Guide for Windows Users
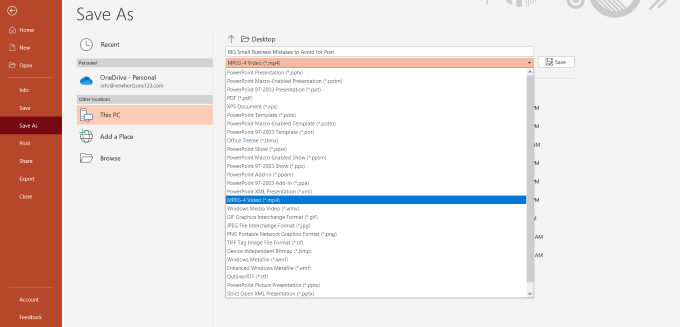
Accessing the Export Feature
To begin converting your PowerPoint presentation to a video on Windows, follow these steps:
- Open your completed PowerPoint presentation.
- Click on the File tab in the top-left corner of the screen.
- Select Export from the menu options.
- Choose the Create a Video option. This will open a panel where you can customize your video settings.
PowerPoint allows you to include narrations, laser pointer gestures, and recorded timings in your video. If you have already added these elements, select the option labeled Use Recorded Timings and Narrations to ensure they are part of the final video.
Choosing Video Settings and Resolution
After accessing the export feature, you can adjust the video settings to match your needs:
- Select the desired video resolution. PowerPoint offers several options, including:
- Ultra HD (4K): Best for high-quality presentations on large screens.
- Full HD (1080p): Suitable for most professional uses.
- HD (720p): Ideal for smaller file sizes and online sharing.
- Decide how long each slide should appear if you haven't recorded timings. Enter the duration in the field provided.
- Click Create Video and choose a location to save your file. PowerPoint will begin rendering your presentation as a video.
Pro Tip: Higher resolutions result in better video quality but may increase the file size. Choose a resolution that balances quality and file size based on your audience and platform.
Step-by-Step Guide for MacOS Users
Exporting as a Movie File
On MacOS, exporting your PowerPoint presentation as a video is just as simple:
- Open your PowerPoint presentation.
- Click on File in the top menu bar.
- Select Export from the dropdown menu.
- In the export window, choose MP4 or MOV as the file format. These formats are widely compatible with most devices and platforms.
If you've included narrations or recorded timings, PowerPoint will automatically incorporate them into the video. This feature ensures your audience experiences the presentation exactly as you intended.
PowerPoint Video Export Options Comparison
Resolution quality vs. file size trade-offs:
Adjusting Playback Options
Before finalizing your video, customize the playback options to enhance the viewing experience:
- Set the video resolution. Similar to Windows, you can choose between Ultra HD (4K), Full HD (1080p), or HD (720p).
- Adjust the slide duration if you haven't recorded timings. Specify how long each slide should remain on the screen.
- Click Export to save your video. PowerPoint will process the file and notify you when the export is complete.
Quick Tip: Test your video on different devices to ensure compatibility and optimal playback quality.
By following these steps, you can easily convert your PowerPoint presentation into a video. This format is perfect for sharing on platforms like YouTube, embedding in websites, or sending to clients and colleagues.
7 Tools for Creating Audio-Visual Presentations
PageOn.ai: AI-Powered Presentation Tool
Overview of PageOn.ai Features
PageOn.ai is an innovative tool that leverages artificial intelligence to simplify the process of creating professional presentations. It offers features designed to save time and enhance creativity. With its AI-driven capabilities, you can generate slide layouts, suggest content ideas, and even optimize visuals for maximum impact.
Key features include:
- AI-Powered Slide Generation: Automatically create slides based on your input or outline.
- Content Suggestions: Receive recommendations for text, images, and multimedia elements.
- Customizable Templates: Access a library of templates tailored to various industries and purposes.
- Real-Time Collaboration: Work with team members simultaneously on the same presentation.
This tool is ideal for users who want to streamline their workflow while maintaining a high level of quality and professionalism.
Step-by-Step Guide to Using PageOn.ai
- Sign Up and Log In: Create an account on the PageOn.ai platform and log in to access its features.
- Choose a Template: Select a template that aligns with your presentation's theme or purpose.
- Input Your Content: Enter your text, upload images, or provide an outline. The AI will generate slides based on your input.
- Customize Slides: Adjust fonts, colors, and layouts to match your preferences or branding.
- Add Multimedia: Incorporate audio, video, or animations to enhance engagement.
- Preview and Export: Review your presentation and export it in your desired format, such as PowerPoint or PDF.
"AI tools like PageOn.ai empower users to create visually appealing and impactful presentations with minimal effort."
Canva
Overview of Canva Features
Canva is a versatile design platform that simplifies the creation of visually stunning presentations. It provides an intuitive drag-and-drop interface, making it accessible even for beginners. Canva offers a wide range of templates, graphics, and multimedia elements to help you craft engaging slides.
Key features include:
- Extensive Template Library: Choose from thousands of professionally designed templates.
- Drag-and-Drop Editor: Easily add and arrange text, images, and other elements.
- Multimedia Integration: Incorporate videos, animations, and audio files into your slides.
- Collaboration Tools: Share your project with others and edit in real-time.
Prezi
Overview of Prezi Features
Prezi stands out for its unique approach to presentations, offering a zoomable canvas instead of traditional slide decks. This feature allows you to create dynamic and interactive presentations that captivate your audience. Prezi is particularly effective for storytelling and presenting complex ideas.
Presentation Tool Feature Comparison
Comparing key features across popular presentation tools:
Audacity
Overview of Audacity Features
Audacity is a free, open-source audio editing software that provides powerful tools for creating and refining audio files. It is widely used for recording, editing, and enhancing sound, making it an excellent choice for presentations requiring high-quality audio. The software supports multiple audio formats and offers a user-friendly interface suitable for beginners and professionals alike.
Camtasia
Overview of Camtasia Features
Camtasia is a screen recording and video editing software designed to help you create professional video presentations. It combines intuitive tools with advanced features, making it ideal for recording tutorials, product demos, or narrated presentations. Camtasia's all-in-one platform simplifies the process of capturing, editing, and sharing videos.
Visme
Overview of Visme Features
Visme is a cloud-based design platform that empowers you to create visually stunning presentations, infographics, and other multimedia content. Its intuitive interface and extensive library of templates make it accessible for users of all skill levels. Visme focuses on helping you design presentations that are both engaging and professional.
Microsoft Sway
Overview of Microsoft Sway Features
Microsoft Sway offers a modern approach to creating interactive and visually appealing presentations. Unlike traditional slide-based tools, Sway uses a web-based canvas that allows you to design dynamic and responsive presentations. It simplifies the process of storytelling by focusing on content flow and audience engagement.
Key features of Microsoft Sway include:
- Interactive Design: Sway enables you to create presentations that adapt to different devices, ensuring a seamless viewing experience on desktops, tablets, and smartphones.
- Built-In Templates: Choose from a variety of professionally designed templates to kickstart your project. These templates help maintain a polished and cohesive look.
- Multimedia Integration: Easily embed videos, images, and audio files to enhance your presentation. Sway supports drag-and-drop functionality for quick and effortless media addition.
- Cloud-Based Accessibility: Access your presentations from anywhere with an internet connection. Sway automatically saves your work in the cloud, eliminating the risk of data loss.
- Effortless Sharing: Share your presentation via a link or embed it directly into websites and blogs. This feature makes it easy to distribute your content to a wider audience.
Tips for Creating Effective Video Presentations
Keep It Short and Focused
A concise video presentation ensures your audience stays engaged. Long presentations often lose attention, making it harder for viewers to retain information. Aim to deliver your message within a clear and focused timeframe. Break down complex topics into smaller, digestible sections. Each slide should highlight one key idea or point.
To maintain focus, avoid overloading slides with text or visuals. Use bullet points to summarize information and keep your design clean. For example:
- Highlight essential points only.
- Use visuals like charts or images to support your message.
- Limit each slide to a single topic.
"The shorter and more focused your presentation, the more likely your audience will remember your key points."
Use High-Quality Multimedia
High-quality multimedia enhances the professionalism of your video presentation. Poor visuals or distorted audio can distract your audience and reduce the impact of your content. Use high-resolution images and videos that align with your topic. Ensure your audio is clear, free of background noise, and at an appropriate volume.
Practice Your Narration
Your narration plays a crucial role in delivering your message. A well-practiced narration adds clarity and confidence to your presentation. Write a script to organize your thoughts and ensure your narration aligns with your slides. Practice reading it aloud to refine your tone, pace, and pronunciation.
Here's how to improve your narration:
- Write a Script: Outline what you'll say for each slide. Keep it concise and relevant.
- Practice Timing: Match your narration to the visuals on your slides. Avoid rushing or dragging.
- Record and Review: Use PowerPoint's "Record Slide Show" feature to record your narration. Play it back to identify areas for improvement.
- Engage Your Audience: Speak clearly and with enthusiasm. Vary your tone to emphasize key points.
Test Your Presentation Before Sharing
Testing your presentation ensures it runs smoothly and delivers the intended impact. A thorough review helps you identify and fix any issues with audio, video, or transitions. This step guarantees a professional and seamless experience for your audience.
Check Multimedia Playback
Verify that all multimedia elements function as expected. Play each audio and video file to ensure they load correctly and align with your slides. Adjust volume levels to maintain consistency throughout the presentation. For example, if you've added narrations or voiceovers, confirm they are clear and free of background noise.
"Microsoft PowerPoint allows you to include narrations, animations, or voiceovers in your presentation. Ensure these elements are synchronized and enhance your content."
Frequently Asked Questions About Creating Video Presentations
How Do I Add Background Music to My Presentation?
Adding background music to your presentation can enhance its emotional impact and keep your audience engaged. PowerPoint makes this process simple and user-friendly. Follow these steps to include background music in your slides:
- Insert the Audio File:
Navigate to the Insert tab and select Audio. Choose Audio on My PC to upload a music file from your computer. Supported formats include MP3 and WAV. - Set Playback Options:
After inserting the audio, click on the audio icon that appears on your slide. Go to the Playback tab and select Play in Background. This option ensures the music plays across all slides without interruptions. - Adjust Volume and Timing:
Use the volume settings to balance the music with any narration or sound effects. Trim the audio if necessary by selecting Trim Audio under the Playback tab. This feature allows you to start and end the music at specific points. - Test the Audio:
Preview your presentation to ensure the music complements your content. Adjust the timing or volume as needed for a seamless experience.
Pro Tip: Choose instrumental tracks or subtle melodies to avoid distracting your audience from the main message. Tools like Canva also allow you to add music to presentations created on their platform, offering a wide range of audio options.
Can I Edit My Presentation After Exporting It as a Video?
Once you export your presentation as a video, editing the original PowerPoint file becomes essential if changes are needed. The video file itself cannot be directly edited. Here's how you can manage this process:
- Reopen the Original PowerPoint File:
Open the PowerPoint file you used to create the video. Make the necessary edits to your slides, audio, or animations. - Re-export the Presentation:
After making changes, export the updated presentation as a new video. Go to File > Export > Create a Video and follow the same steps you used initially. - Save Multiple Versions:
To avoid confusion, save each version of your presentation with a unique name. For example, use names like Presentation_V1 or Presentation_Final.
What File Formats Are Best for Sharing My Presentation?
Choosing the right file format ensures your presentation is accessible and maintains its quality. The best format depends on how and where you plan to share it. Below are the most common options:
- MP4:
MP4 is the most widely used video format. It offers high compatibility with various devices and platforms, including YouTube, social media, and email. PowerPoint exports videos in MP4 by default, making it an excellent choice for sharing.
- MOV:
MOV works well for Mac users and provides high-quality video output. It is ideal for presentations that require playback on Apple devices or software. - PDF:
If you prefer to share static slides, exporting your presentation as a PDF ensures the layout and design remain intact. This format is perfect for email attachments or printed handouts.
- PPTX:
Sharing the editable PowerPoint file (PPTX) allows collaborators to make changes. Use this format when working with a team or seeking feedback.
Pro Tip: Test your presentation on different devices before sharing. This step ensures compatibility and optimal playback quality. Platforms like Canva also support multiple export formats, giving you flexibility in how you distribute your content.
Conclusion
Creating an audio-visual presentation in PowerPoint becomes simple when you use the right tools and techniques. By incorporating multimedia elements, animations, and transitions, you can craft presentations that captivate your audience. Tools like PageOn.ai streamline the process with AI-powered features, while software like Camtasia offers advanced editing options for professional results. These tools allow you to record, edit, and enhance your content effortlessly. Start exploring these methods today to transform your ideas into impactful presentations. With practice and creativity, you can deliver messages that leave a lasting impression.
Ready to Create Stunning Presentations?
Transform your ideas into professional audio-visual presentations with PageOn.ai's intuitive AI-powered tools. Create engaging content that resonates with your audience.
Try PageOn.ai TodayYou Might Also Like
Transforming Content Discovery: Filtered Views and Metadata for Better Organization
Discover how filtered views and metadata can revolutionize content discovery and organization. Learn implementation strategies and visualization techniques with PageOn.ai.
Transforming Presentation Creation Through Conversational AI | Building Presentations With Natural Language
Discover how natural language conversations are revolutionizing presentation creation, enabling faster, more intuitive visual storytelling with AI assistance that transforms abstract ideas into compelling visuals.
Mastering PowerPoint File Conversions: Preserve Formatting While Editing | PageOn.ai
Learn expert strategies to edit converted PowerPoint files without losing formatting. Discover pre-conversion preparation, formatting fixes, and how PageOn.ai helps maintain visual integrity.
Creating Engaging Visual Process Guides: Transform Complex Workflows into Interactive Timelines
Learn how to create effective visual process guides using interactive timelines. Transform complex workflows into clear, engaging visual timelines that improve comprehension and drive better results.