How to Round the Edges of a Photo in Google Slides(2025 Update)
A simple technique to enhance your presentation's visual appeal
Rounding the edges of a photo can transform the look of your slides. It softens the image and makes your presentation more visually appealing. Google Slides offers a straightforward way to achieve this effect. You don't need advanced design skills to create polished and professional-looking slides. Learning how to round the edges a photo in Google Slides will help you elevate your designs effortlessly. This simple technique can make your content stand out and leave a lasting impression on your audience.
Why Round the Edges of a Photo?
Enhances Visual Appeal
When you round the edges of a photo, it immediately softens the overall look of your slide. Sharp corners can sometimes feel harsh or out of place, especially in creative or informal presentations. Rounded edges create a more inviting and modern design. This subtle change can make your slides feel more cohesive and visually pleasing. For example, if your presentation includes vibrant colors or playful themes, rounded edges can complement the style perfectly.
Creates a Polished Look
Rounded edges give your photos a professional and refined appearance. Straight corners often look rigid, while rounded ones add a touch of sophistication. This small adjustment can make a big difference in how your audience perceives your presentation. Whether you're creating slides for a business meeting or a school project, rounded edges can elevate the overall design.
Improves Focus on Content
Rounded edges help direct attention to the content of your photo. When the corners are softened, the viewer's eyes naturally focus on the center of the image. This effect can be especially useful when you want to highlight specific details or subjects in your photo. For instance, if your slide includes a portrait or a product image, rounding the edges can make the subject stand out more effectively.
Tip: Experiment with different levels of roundness to find the perfect balance for your slide. Too much rounding might distort the image, while too little may not achieve the desired effect.
How to Round the Edges of a Photo in Google Slides

Process Overview
Follow this simple workflow to round the edges of your photos:
flowchart TD
    A[Insert Image] -->|Upload or drag & drop| B[Select Image]
    B --> C[Click Mask Tool]
    C -->|Choose from dropdown| D[Select Rounded Rectangle]
    D --> E[Adjust Roundness]
    E -->|Using blue handles| F[Finalize Position]
    F -->|Hold Shift while resizing| G[Complete]
Insert the Image
To begin, you need to insert your image into Google Slides. Follow these simple steps:
- Open your Google Slides presentation.
- Navigate to the menu bar and click on "Insert."
- Select "Image" from the dropdown menu. You will see several options, such as uploading from your computer, searching the web, or choosing from Google Drive or Photos.
- Choose the method that works best for you. For example, you can drag and drop an image directly onto the slide for quick access.
- Once the image appears on the slide, resize and position it as needed.
This step sets the foundation for learning how to round the edges a photo in Google Slides. Make sure the image is properly aligned before moving to the next step.
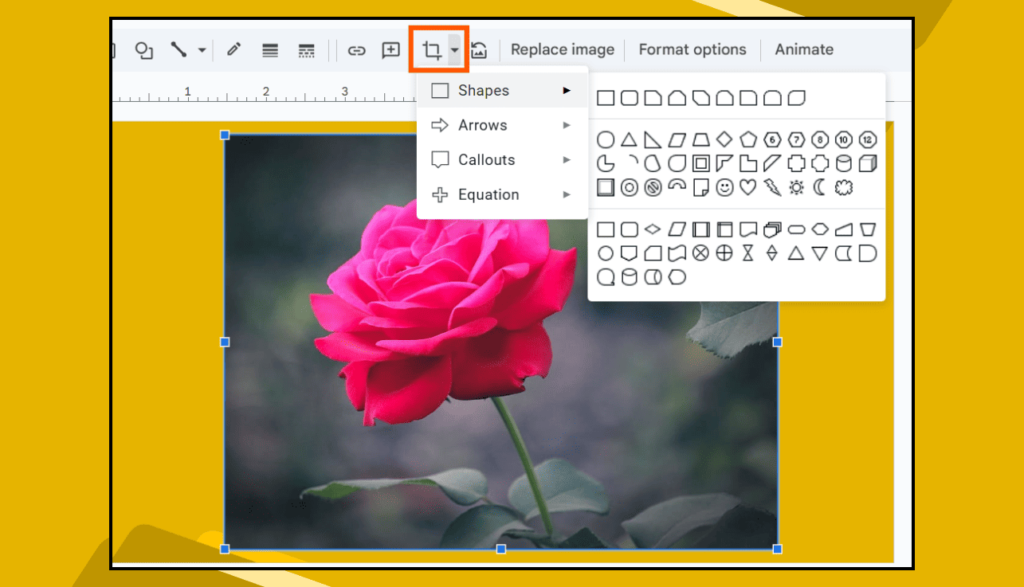
Access the Crop and Mask Tools
After inserting the image, you need to access the cropping feature to start shaping the image. Look at the toolbar at the top of your screen. You will find the crop tool represented by a small icon resembling two overlapping right angles. Next to it, you will see the mask tool, which allows you to apply shapes to your image.
Click on the mask tool to reveal a dropdown menu with various shape options. These tools are essential for learning how to make image round or apply other creative effects. By using them, you can transform your image into a visually appealing element with rounded edges.
Apply the Rounded Rectangle Shape
Once you access the mask tool, select the "Rounded Rectangle" shape from the dropdown menu. This shape is perfect for creating smooth, rounded edges. After selecting it, the mask will automatically apply to your image.
At this stage, you have successfully learned how to round the edges a photo in Google Slides. The rounded rectangle shape gives your image a polished and modern look. If you want to adjust the roundness further, you can use the blue handles on the image corners.
Adjust the Roundness
After applying the rounded rectangle shape to your image, you can fine-tune the roundness of the corners to achieve the desired effect. Google Slides provides blue handles on the edges of the image for this purpose. These handles allow you to control how rounded the corners appear.
To adjust the roundness, click on the image to activate the shape mask. Locate the small blue handles on the corners of the image. Drag these handles inward or outward to increase or decrease the curve of the edges. A slight adjustment can make a big difference in the overall look of your image.
Tip: Keep the roundness consistent across all images in your presentation. This creates a cohesive and polished design.
Finalize the Look
Once you've adjusted the roundness, it's time to align and resize the image for a professional finish. Proper alignment and sizing ensure that your image fits seamlessly into your slide layout. Follow these best practices to finalize the look:
- Hold the Shift key while resizing the image to maintain its aspect ratio. This prevents distortion and keeps the image looking natural.
- Use the rulers and smart guides in Google Slides to align the image precisely with other elements on the slide. These tools help you position the image evenly and maintain a balanced layout.
- Enable the Snap to Grid feature for automatic alignment. This feature ensures that your image aligns perfectly with grid lines, creating a uniform and organized design.
Note: If you want to crop image into circle shape instead of rounded rectangle, you can select the circle shape mask from the mask tool dropdown. This option works well for profile pictures or logos.
PageOn.ai: A Game-Changing Tool for Presentations
PageOn.ai is an innovative tool designed to revolutionize how you create presentations. It uses advanced AI technology to simplify the process of designing slides, making it accessible to everyone. Whether you're a student, educator, or professional, this tool adapts to your needs.
PageOn.ai Workflow
See how PageOn.ai transforms your presentation creation process:
flowchart TD
    A[Input Topic] --> B[AI Generates Outline]
    B --> C[Select Template]
    C --> D[AI Creates Content]
    D --> E[Add AI Images]
    E --> F[Generate Charts]
    F --> G[Review & Customize]
    G --> H[Download Presentation]
Key Features and Benefits
AI Search and Virtual Presentation Integration
PageOn.ai offers an AI search feature that helps you find relevant content for your slides. This feature ensures your presentation includes accurate and well-organized information. Additionally, the tool integrates virtual presentation capabilities, allowing you to rehearse and refine your delivery.
Data Analysis and Report Generation
If your presentation involves data, PageOn.ai simplifies the process of analysis and visualization. The tool can generate detailed reports and charts based on your input. This feature is especially useful for business professionals and educators who need to present complex information clearly.
AI Image Generation for Presentations
Creating visuals for your slides can be time-consuming. PageOn.ai solves this problem by generating AI-powered images tailored to your presentation's theme. These images enhance the visual appeal of your slides and ensure they align with your content.
How to Use PageOn.ai
Step 1: Visit the PageOn.ai Website
Start by accessing the PageOn.ai platform. The website provides a user-friendly interface that guides you through the process.
Step 2: Input Your Topic or Upload Reference Files
Enter your presentation topic or upload any reference materials. This step helps the AI understand your requirements and generate relevant content.
Step 3: Review the AI-Generated Outline and Choose a Template
Once you provide the input, the tool creates an outline for your presentation. Review the suggestions and select a template that suits your style. The templates are designed to be visually appealing and easy to customize.
Step 4: Customize the Presentation with AI-Generated Images and Charts
Enhance your slides by adding AI-generated images and charts. These visuals are tailored to your content and can be adjusted to fit your preferences. This step ensures your presentation looks professional and cohesive.
Step 5: Save or Download Your Presentation
After finalizing your slides, save or download the presentation. PageOn.ai ensures your work is ready for sharing or presenting, making the entire process seamless.
Tip: Use the AI-generated speaking prompts to practice your delivery. This feature helps you stay confident and organized during your presentation.
Advanced Image Editing Techniques in Google Slides

Image Effect Popularity
The following chart shows the popularity of different image effects among presenters:
Using Transparency Effects
Adjusting Image Transparency for Creative Designs
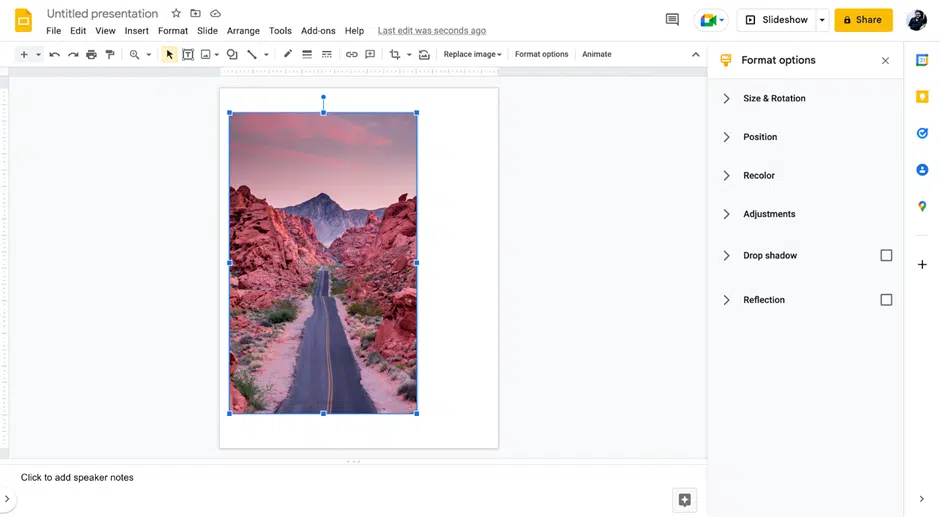
Transparency effects can add a unique touch to your slides. By adjusting the transparency of an image, you can create a layered look or blend the image with the background. This technique works well for adding subtle textures or creating a sense of depth in your design.
To adjust transparency, select the image you want to modify. Then, click on the "Format Options" button in the toolbar. In the panel that appears, locate the "Adjustments" section. Here, you will find a slider labeled "Transparency." Move the slider to the right to increase transparency or to the left to make the image more opaque.
Tip: Use transparency effects to highlight text or other key elements on your slide. This technique ensures your audience focuses on the most important parts of your presentation.
Adding Drop Shadows and Reflections
Steps to Apply Shadows and Reflections to Images
Drop shadows and reflections can make your images stand out by adding depth and dimension. These effects are easy to apply in Google Slides and can transform a flat image into a dynamic visual element.
To add a drop shadow:
- Select the image you want to enhance.
- Click on "Format Options" in the toolbar.
- Check the box next to "Drop Shadow" to enable the effect.
- Customize the shadow by adjusting settings like color, transparency, angle, distance, and blur radius.
For reflections:
- Select the image.
- Open the "Format Options" panel.
- Check the box next to "Reflection."
- Adjust the transparency, distance, and size of the reflection to suit your design.
Layering Images for Creative Designs
Overlapping and Arranging Images Effectively
Layering images allows you to create visually engaging designs. By overlapping images, you can add depth and complexity to your slides. This technique works well for storytelling or emphasizing relationships between elements.
Start by selecting the images you want to layer. Use the "Arrange" menu to bring images forward or send them backward. Adjusting transparency can also enhance the layered effect, making some images appear as if they are in the background. Shape masks can crop images into unique designs, adding variety to your layout.
Combining Shapes and Images
Merging Shapes and Photos for Unique Visuals
Combining shapes and images in Google Slides can elevate your presentation design. This technique allows you to create unique visuals that capture attention and communicate ideas effectively. By merging these elements, you can transform ordinary slides into dynamic and engaging designs.
One of the key benefits of combining shapes with images is the ability to create visual metaphors. For example, you can use overlapping circles to symbolize connection or growth. These metaphors help convey abstract concepts in a way that is easy for your audience to understand.
To merge shapes and photos effectively, follow these steps:
- Insert your image into the slide and position it where you want.
- Add a shape from the toolbar by selecting "Insert" > "Shape."
- Resize and align the shape to fit your design. Use the "Arrange" menu to layer the shape above or below the image.
- Adjust the transparency, color, or border of the shape to match your theme.
- Experiment with different combinations to find the most visually appealing layout.
Note: Keep your design balanced by aligning shapes and images with the slide's gridlines. This ensures a clean and professional look.
Conclusion
Rounding the corners of a photo in Google Slides is a straightforward process that enhances your presentation's visual appeal. By using tools like the image mask and adjusting the roundness with blue handles, you can create polished designs effortlessly. Adding borders or captions further refines the look, ensuring your slides stand out.
For more advanced presentations, PageOn.ai offers a game-changing solution. Its AI-powered features simplify tasks like cropping images for presentations, generating visuals, and organizing content. This tool saves time and makes professional designs accessible to everyone.
Experimenting with advanced techniques, such as animations or multimedia embedding, can elevate your slides even further. These methods help you create engaging and memorable presentations that captivate your audience.
Tip: Consistency in design, like maintaining uniform round corners across slides, ensures a cohesive and professional appearance.
You Might Also Like
From What to Why in Business Presentations: Purpose-Driven Storytelling Strategy
Transform your business presentations from data-heavy information delivery to purpose-driven storytelling that engages audiences and drives decisions with these expert strategies.
Mastering Workplace Communication with International Phonetic Alphabet (IPA) - Visual Guide
Discover how the International Phonetic Alphabet transforms workplace communication. Learn visual approaches to implement IPA for clearer global business interactions.
Audience-Centered Pitching Techniques: Visual Strategies That Win Every Time
Discover powerful audience-centered pitching techniques using visual storytelling, interactive engagement, and benefit visualization strategies that consistently win over any audience.
The Art of Instant Connection: Crafting Opening Strategies That Captivate Any Audience
Discover powerful opening strategies that create instant audience connection. Learn visual storytelling, interactive techniques, and data visualization methods to captivate any audience from the start.