How to Save Google Slides as a PDF in 2025 with Simple Steps
Saving your Google Slides presentation as a PDF offers several advantages. It ensures universal accessibility, allowing anyone to view the file on any device or operating system. The PDF format preserves the original layout and design, so your slides look exactly as intended. This makes it ideal for sharing through emails or instant messaging. Whether you're preparing for a professional meeting or an educational project, knowing how to save Google Slides as PDF can simplify distribution and maintain the quality of your work.
Benefits of Saving Google Slides as a PDF
Saving your Google Slides as a PDF offers several advantages that make it a practical choice for sharing and storing presentations. Let's explore the key benefits.
Key PDF Benefits Comparison
The following chart compares the advantages of PDF format against other presentation formats:
Easy Sharing and Accessibility
PDFs are one of the most widely accepted file formats. When you save your Google Slides as a PDF, you ensure that anyone can open and view your presentation without needing special software. This makes it easier to share your work with colleagues, teachers, or clients. Whether they use a computer, tablet, or smartphone, they can access your file without compatibility issues.
Additionally, PDFs are ideal for printing. If you need hard copies of your slides, a PDF ensures that the printed version matches the digital one. This flexibility makes PDFs a reliable choice for both digital and physical sharing.
Preserves Formatting Across Devices
One of the biggest challenges with digital presentations is maintaining their design across different devices. When you save your slides as a PDF, the formatting stays consistent. Fonts, images, and layouts appear exactly as you created them, regardless of the device or software used to open the file.
For example, if you send your presentation to someone who doesn't have Google Slides or PowerPoint, they can still view it in its original form. This ensures your presentation looks professional and polished every time. A presentation-ready PDF guarantees that your work leaves a lasting impression, no matter where or how it's viewed.
Compact File Size for Storage
PDFs are known for their small file sizes. When you save your Google Slides as a PDF, the file becomes more compact compared to other formats like PowerPoint. This makes it easier to store and share, especially when dealing with limited storage space or slow internet connections.
A smaller file size also means faster uploads and downloads. Whether you're emailing your presentation or uploading it to a cloud service, a PDF ensures quick and hassle-free sharing. This efficiency is particularly useful for large projects or presentations with multiple slides.
Professional Presentation for Printing
When you need to print your Google Slides presentation, saving it as a PDF ensures a professional and polished result. PDFs are widely recognized for their ability to maintain the integrity of your design, making them the preferred choice for high-quality printing.
PDFs preserve consistent color profiles, ensuring the colors you see on screen match the printed version. They also lock in your layout, preventing any changes to design elements like charts, images, or custom fonts. This is especially important when your slides contain intricate details that need to be presented exactly as designed.

How to Save Google Slides as a PDF on Desktop
Saving your Google Slides presentation as a PDF on a desktop is a straightforward process. Follow these steps to ensure your presentation is ready for sharing or printing.
PDF Export Process
Below is a visualization of the workflow for saving Google Slides as PDF:
flowchart TD
    A[Open Google Slides] --> B[Click File Menu]
    B --> C[Hover Over Download]
    C --> D[Select PDF Document]
    D --> E[Choose Save Location]
    E --> F[Save File]

    style A fill:#FF8000,stroke:#333,stroke-width:1px,color:white
    style F fill:#FF8000,stroke:#333,stroke-width:1px,color:white
Basic Steps to Save as PDF
- Open your Google Slides presentation.
- Click on the "File" menu at the top of the screen.
- Hover over "Download" and select "PDF Document (.pdf)."
- Save the file to your preferred location on your computer.
These steps allow you to quickly create a PDF file of your presentation. The PDF format ensures your slides retain their original design and layout, making it ideal for sharing or archiving.
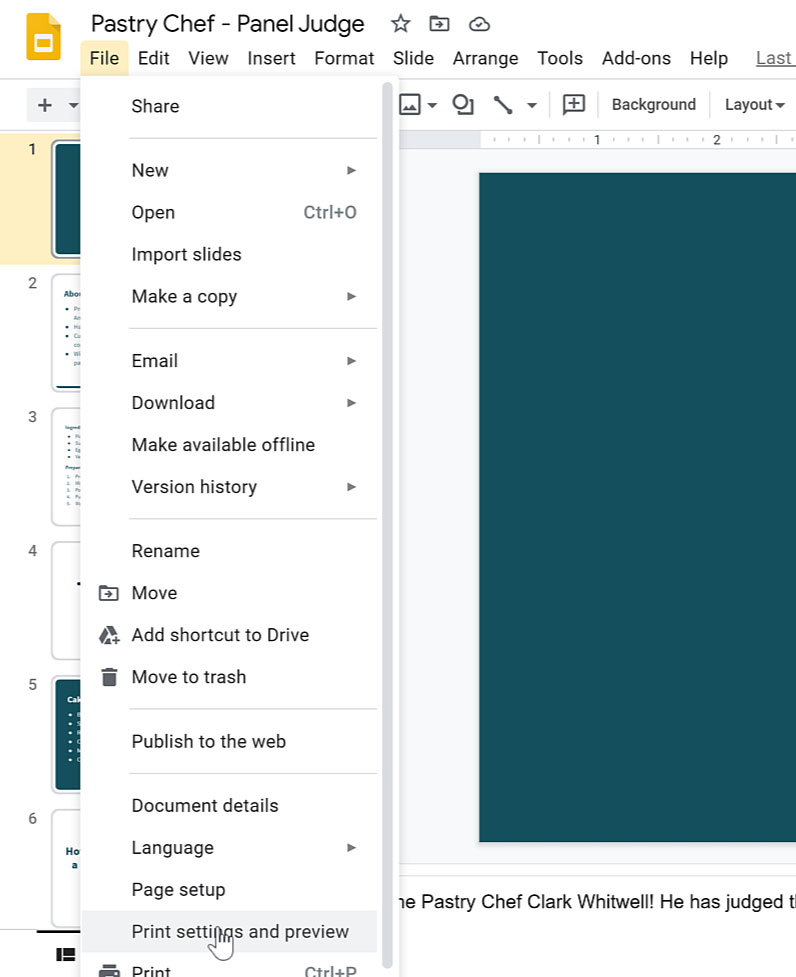
Including Speaker Notes in the PDF
Speaker notes can enhance your presentation by providing additional context or acting as a reference during delivery. To include them in your PDF, follow these steps:
- Open the "File" menu in your Google Slides presentation.
- Select "Print settings and preview."
- Check the box labeled "Include speaker notes."
- Close the preview window and return to the "File" menu.
- Choose "Download" and select "PDF Document (.pdf)."
Including speaker notes in your PDF offers several benefits. You can use them as a guide while presenting or share them with your audience to provide more detailed explanations. This feature also allows you to create comprehensive handouts for offline use.
Adjusting Slide Layout and Background
Before exporting your Google Slides presentation as a PDF, you may want to customize the slide layout and background. Proper adjustments ensure your presentation looks polished and professional.
- Open your presentation and navigate to the "Slide" menu.
- Select "Page setup" to modify the slide dimensions. Choose a size that fits your needs, such as widescreen or standard.
- To edit the background, click on "Background" in the toolbar. You can change the color, add an image, or reset it to default.
- If you need to adjust the layout, go to the "Slide" menu and select "Edit theme." This opens the theme builder, where you can resize or reposition elements like text boxes and images.
- Save your changes and proceed to export your presentation as a PDF.
How to Save Google Slides as a PDF on Mobile Devices
Saving a Google Slides presentation as a PDF on your mobile device is simple and convenient. Whether you use the Google Slides app or a mobile browser, you can quickly create a PDF file of your presentation.
Mobile PDF Export Methods
Compare the two approaches for saving PDFs on mobile:
flowchart LR
    subgraph "Google Slides App"
    A1[Open App] --> B1[Tap Menu ⁝]
    B1 --> C1[Select Share & Export]
    C1 --> D1[Choose Save As]
    D1 --> E1[Select PDF Format]
    E1 --> F1[Confirm & Save]
    end

    subgraph "Mobile Browser"
    A2[Open Browser] --> B2[Navigate to Google Slides]
    B2 --> C2[Open File Menu]
    C2 --> D2[Select Download]
    D2 --> E2[Choose PDF Document]
    E2 --> F2[Save to Device]
    end

    style A1 fill:#FF8000,stroke:#333,stroke-width:1px,color:white
    style A2 fill:#FF8000,stroke:#333,stroke-width:1px,color:white
    style F1 fill:#FF8000,stroke:#333,stroke-width:1px,color:white
    style F2 fill:#FF8000,stroke:#333,stroke-width:1px,color:white
Using the Google Slides App on iPhone/iPad
The Google Slides app offers a straightforward way to save your presentation as a PDF. Here's how you can do it:
- Open the Google Slides app and locate the presentation you want to save.
- Tap the three-dot menu (⁝) in the top-right corner of the screen.
- From the menu that appears, select "Share and export."
- Choose the "Save as" option.
- A list of file formats will appear. Select "PDF Document (.pdf)."
- Confirm your choice by tapping "OK." The app will save your presentation as a PDF file.
This method is quick and ensures your presentation retains its original design. Unlike the desktop version, the app simplifies the process by combining all options into one menu. You don't need to adjust print settings or preview layouts, making it ideal for on-the-go use.
Using a Browser on Mobile
If you don't have the Google Slides app, you can still save your presentation as a PDF using your mobile browser. The process mirrors the steps you would follow on a desktop.
- Open your mobile browser and navigate to Google Slides.
- Access your Google Slides presentation by logging into your account.
- Tap the "File" menu at the top of the screen.
- Select "Download" and choose "PDF Document (.pdf)."
- Save the file to your device.

Customization Options When Saving as a PDF
When saving your Google Slides presentation as a PDF, you can customize several aspects to enhance its usability and appearance. These options allow you to tailor the final document to meet your specific needs, whether for sharing, printing, or archiving.
PDF Customization Options
Popularity of different customization options when exporting to PDF:
Adjusting the Number of Slides Per Page
You can control how many slides appear on each page of your PDF. This feature is especially useful when creating handouts or summaries. To adjust the number of slides per page, follow these steps:
- Open your Google Slides presentation.
- Click on the "File" menu and select "Print settings and preview."
- Use the dropdown menu to choose the number of slides per page. Options include 1, 2, 3, 4, 6, or 9 slides.
- Preview the layout to ensure it meets your needs.
- Click "Download as PDF" to save the customized file.
Each option serves a unique purpose. For example, selecting three slides per page provides space for note-taking, making it ideal for lectures or training sessions. Four slides per page strikes a balance between readability and compactness, while nine slides offer a condensed overview for personal reference.
Adding Headers and Footers
Headers and footers can add a professional touch to your PDF. They allow you to include details like page numbers, dates, or your organization's name. To customize these elements:
- Open the "Print settings and preview" menu in Google Slides.
- Look for the header and footer options.
- Add the desired text or elements, such as a title or page number.
- Preview the changes to confirm their placement.
- Save the file as a PDF.
Optimizing File Size
Large file sizes can make sharing or storing PDFs inconvenient. Optimizing your file ensures it remains manageable without compromising quality. Here are some tips to reduce the size of your PDF:
- Resize images within Google Slides by cropping or reducing their dimensions.
- Compress images by selecting "Format" > "Images" > "Compress Images" and choosing a high-quality setting.
- Remove unnecessary elements, such as unused slides or excessive graphics.
- Adjust image resolution before exporting the presentation as a PDF.

Convert PDF Files into Presentations Quickly with PageOn.ai
Creating presentations from PDFs can be time-consuming, but PageOn.ai simplifies the process with its AI-powered tools. This platform offers innovative features that help you design impactful presentations effortlessly.
What is PageOn.ai?
PageOn.ai is an advanced tool that uses artificial intelligence to streamline presentation creation. It allows you to convert PDFs into slides while preserving the original document's structure and design. The platform also provides automatic slide generation from text, making it easier to create professional presentations. Its user-friendly interface ensures a smooth experience, even for beginners.
Key Features of PageOn.ai
PageOn.ai stands out due to its unique features that enhance productivity and creativity:
- AI-Powered Design: Automatically generates slides from your content, saving you time.
- User-Friendly Interface: Offers easy navigation for seamless presentation creation.
- Engaging Narratives: Uses AI storytelling to enhance your message and captivate your audience.
- Simple Editing Tools: Drag-and-drop functionality helps you organize content effortlessly.
- Cloud-Based Collaboration: Enables real-time teamwork and easy sharing.
- PDF Export Options: Lets you save your presentations as PDFs for convenient sharing or printing.
PageOn.ai Workflow
How PageOn.ai transforms your content into presentations:
flowchart LR
    A[Upload Content] -->|AI Processing| B[Content Analysis]
    B --> C[Auto-Generate Structure]
    C --> D[Create Visual Elements]
    D --> E[Apply Design Templates]
    E --> F[Export Options]
    F -->|Download| G[PDF Format]
    F -->|Share| H[Presentation Link]
    F -->|Edit| I[Further Customization]

    style A fill:#FF8000,stroke:#333,stroke-width:1px,color:white
    style G fill:#FF8000,stroke:#333,stroke-width:1px,color:white
    style H fill:#FF8000,stroke:#333,stroke-width:1px,color:white
    style I fill:#FF8000,stroke:#333,stroke-width:1px,color:white
How to Use PageOn.ai for Your Presentations
Using PageOn.ai to create and export presentations is straightforward. Follow these steps to get started:
- Visit the PageOn.ai homepage and log in to your account.
- Upload your PDF document or input your topic to begin.
- Choose a template that matches your style and preferences.
- Use the AI-generated outline to structure your presentation. This feature organizes your content logically, helping you focus on your message.
- Customize your slides by adding charts, images, and themes. The platform's AI storytelling feature can also enhance your narrative.
- Save your presentation in the cloud for easy access or download it as a PDF.
PageOn.ai's AI-generated outline feature is particularly helpful. It automates the organization of your content, allowing you to concentrate on refining your message. This automation saves time and ensures your presentation is clear and engaging.

Common Issues When Saving Google Slides as a PDF
When saving your Google Slides presentation as a PDF, you might encounter a few common issues. Understanding these problems and their solutions can help you create a polished and professional document.
Common PDF Export Issues
Frequency of issues encountered when exporting Google Slides to PDF:
Formatting Changes
Formatting inconsistencies can occur when exporting your presentation. These issues often involve fonts, images, or layout discrepancies. To avoid these problems, follow these steps:
- Use fonts that are widely supported across devices. Embedding fonts in your PDF ensures they display correctly, regardless of the viewer's system.
- Check your images for compatibility. High-quality images with a resolution of at least 300 dpi work best. Use PNG for transparency or JPEG for photographs.
- Review your presentation for any formatting errors before exporting. Adjust the layout or design as needed.
- Avoid using animations or slide transitions, as these features do not carry over to PDFs.
Large File Sizes
Large file sizes can make sharing or storing your PDF difficult. High-resolution images and excessive content often contribute to this issue. To optimize your file size, try these tips:
- Resize images by cropping or reducing their dimensions. This maintains quality while lowering the file size.
- Compress images using Google Slides' built-in tools. This balances image quality and file size effectively.
- Stick to standard fonts like Arial or Calibri. These fonts require fewer resources and help reduce file size.
- Remove unused slides or unnecessary formatting elements. Cleaning up your presentation streamlines the final PDF.
Missing Speaker Notes
Speaker notes provide valuable context for your presentation. If they are missing from your PDF, it is likely due to incorrect export settings. To include speaker notes, follow these steps:
- Open your Google Slides presentation.
- Navigate to the "File" menu and select "Print preview."
- In the dropdown menu, choose "1 slide with notes." This ensures both slides and speaker notes appear in the PDF.
- Click "Download as PDF" to save the file with the notes included.

Conclusion
Saving a Google Slides presentation as a PDF is a simple yet effective way to enhance its accessibility and professional appeal. Whether you're working on a desktop or mobile device, the process is straightforward and allows for customization, such as adding speaker notes or adjusting layouts.
Tools like PageOn.ai further simplify the process by focusing on content creation while ensuring polished results. To avoid common issues like formatting errors or large file sizes, review your presentation and optimize settings before exporting.
By following the steps outlined in this guide, you can confidently share or archive your work with ease, knowing that your presentation will maintain its design integrity and professional appearance across all devices.
You Might Also Like
PowerPoint Compatibility Solutions: Cross-Version Presentation Success Guide
Discover effective solutions for PowerPoint compatibility issues across versions. Learn to preserve animations, formatting, and graphics while ensuring seamless cross-platform presentation success.
Transforming Content Discovery: Filtered Views and Metadata for Better Organization
Discover how filtered views and metadata can revolutionize content discovery and organization. Learn implementation strategies and visualization techniques with PageOn.ai.
Mastering PowerPoint File Conversions: Preserve Formatting While Editing | PageOn.ai
Learn expert strategies to edit converted PowerPoint files without losing formatting. Discover pre-conversion preparation, formatting fixes, and how PageOn.ai helps maintain visual integrity.
Transforming SharePoint Navigation into Visual Clarity: A Design Framework for Enterprise-Scale Sites
Discover how to design effective navigation systems for large-scale SharePoint sites with our comprehensive visual framework. Learn global, hub, and local navigation strategies.